Heart of Christmas – Christmas Tags & More


Welcome to week 12 of the Heart of Christmas Blog Hop for 2025. Each week until end of November, the talented ladies from the Art with Heart team are bringing you inspiration for your holiday craft projects.
This will be my final Heart of Christmas post for 2025. I’m heading to Europe on Thursday to enjoy the Christmas markets, catch up with friends, drink gluhwein (mulled wine) and (try not to) eat too many cinnamon laden treats! I hope I’m ready for a winter in the Northern Hemisphere!
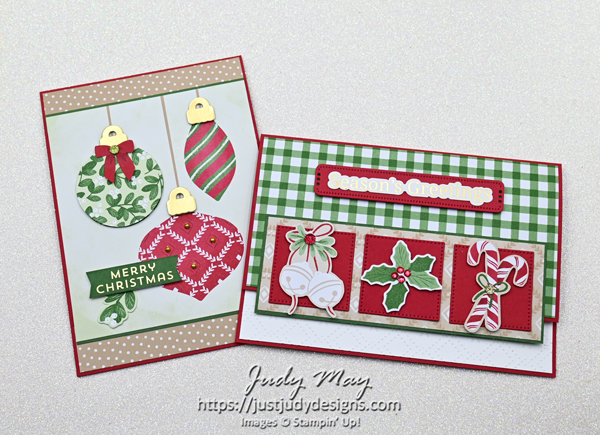
I held my final class for the year last week and I based it on the fabulous Christmas Tags & More DSP. We made 4 card cards including this card and this card that I have blogged previously. However, I wanted to use some of the sheets that were lingering in the pack. This first card was inspired by Claire’s post from few weeks ago, using the squares from the Stylish Shapes Dies as the background for some of the ephemera pieces.
So for my version, I cut one inch off the right edge of the card and added the green gingham to the top section. On the bottom, I added a one inch strip of Basic White that I dry embossed with the new Beautiful Pattern Embossing Folder. I love how fine it is and the geometric design works with the squares. I think the white adds a nice pop to the card. The die cut squares are mounted on one of the side strips that you cut from the garland sheet and I had lots of those to use up. The greeting from the Greetings For You Mix & Max Ephemera Pack is adhered to a Real Red label cropped from the retired Labels Aglow Dies.
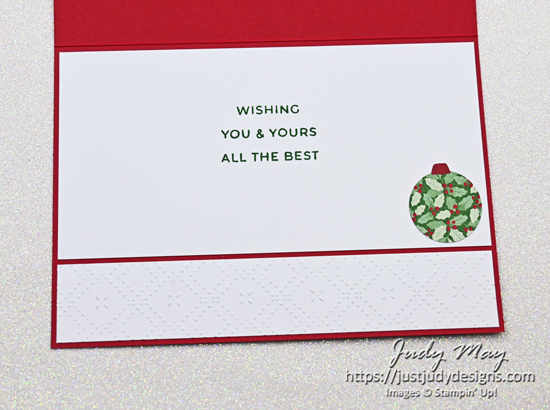
On the inside, you can see the embossed strip I added at the bottom and then the writing panel above. I added a small ornament in the corner to finish. The greeting from the Jolly Holly stamp set was stamped in Garden Green ink.

For this card, I cut the polka dot strip off the side of the sheet of baubles and cut it in half. The pieces were adhered to the top and bottom of the card base. I cut the bauble sheet to fit and added a tiny border of Garden Green Two-Tone to each end.
I’ve dressed up the baubles with Gold Foil hangers and different embellishments on each one. The top left has a another bauble popped up with a bow and sequin, the white stripes in the second bauble have been glitzed with some (retired) Dazzling Diamonds Glitter and (retired) Metallic Pearls were added to the large one. I used another greeting from the Greetings For You Mix & Max Ephemera Pack and coloured it with Garden Green ink using my brayer.
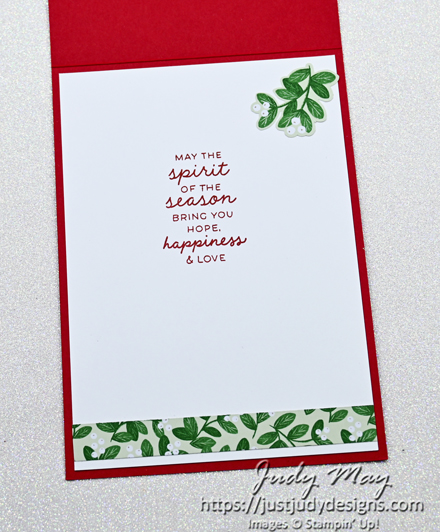
For the inside, I have stamped the greeting from the Jolly Holly stamp set in Real Red ink and added some of the mistletoe paper and coordinating ephemera to finish.
Project Details
- Stamps: Jolly Holly
- Cardstock & Papers: Basic White, Real Red, Garden Green, Garden Green Two-Tone, Christmas Tags & More DSP, Gold Foil
- Ink: Garden Green
- Accessories: Traditional Sparkling Sequins, Rhinestone Basic Jewels, Dazzling Diamonds (retired)
- Tools: Stylish Shapes Dies, Bauble Blooms Dies, Beautiful Pattern EF, Labels Aglow Dies (retired), Stampin’ Cut n Emboss, Dimensionals
Now it’s time to click on the Next Button below, to head over to see the beautiful project that Rosa has created.

If something goes awry, you can find the full list of participants for this week over on Sharon’s blog.
Thanks for visiting today!

- Shop my Online Store 24/7
- See the latest Stampin’ Up! Promotions
- Request a FREE Catalogue
- Check out my Tutorial Store
BLACK FRIDAY SALE…Coming Soon
Announcing our first-ever Black Friday sale!
From 25 November to 1 December, you can get up to 40% off select products.
Don’t forget to mark your calendar so you can save BIG!
Visit the online store starting 25 November to see all the products that will be on sale.


Two bright and cheerful Christmas cards Judy. Enjoy Christmas in Europe and I hope you stay warm
Lovely, Judy! I am happy to hear I have inspired you this time (as you have done many times to me). Have a fabulous holiday, it sounds amazing and I’m looking forward to the photos!
Judy I love how you have split the polka dot panel into two strips and adhered top and bottom of the bauble panel. Love all your embellishment pieces on your cards. Have a wonderful trip, stay warm and Merry Christmas!